Sponsored

teddyang

Well-Known Member
First Name
Ted
Joined
Jun 16, 2022
Threads
24
Messages
264
Reaction score
631
Location
Los Angeles, CA
Vehicles
R1T Adeventure Edition, RB, BM, 21"
Clubs
 
Yes, finished and tooling...working on a proper update to the website and sharing all the details on the slider, turned out AMAZING! Here is the final:
Screenshot 2023-04-06 at 6.16.12 PM.png
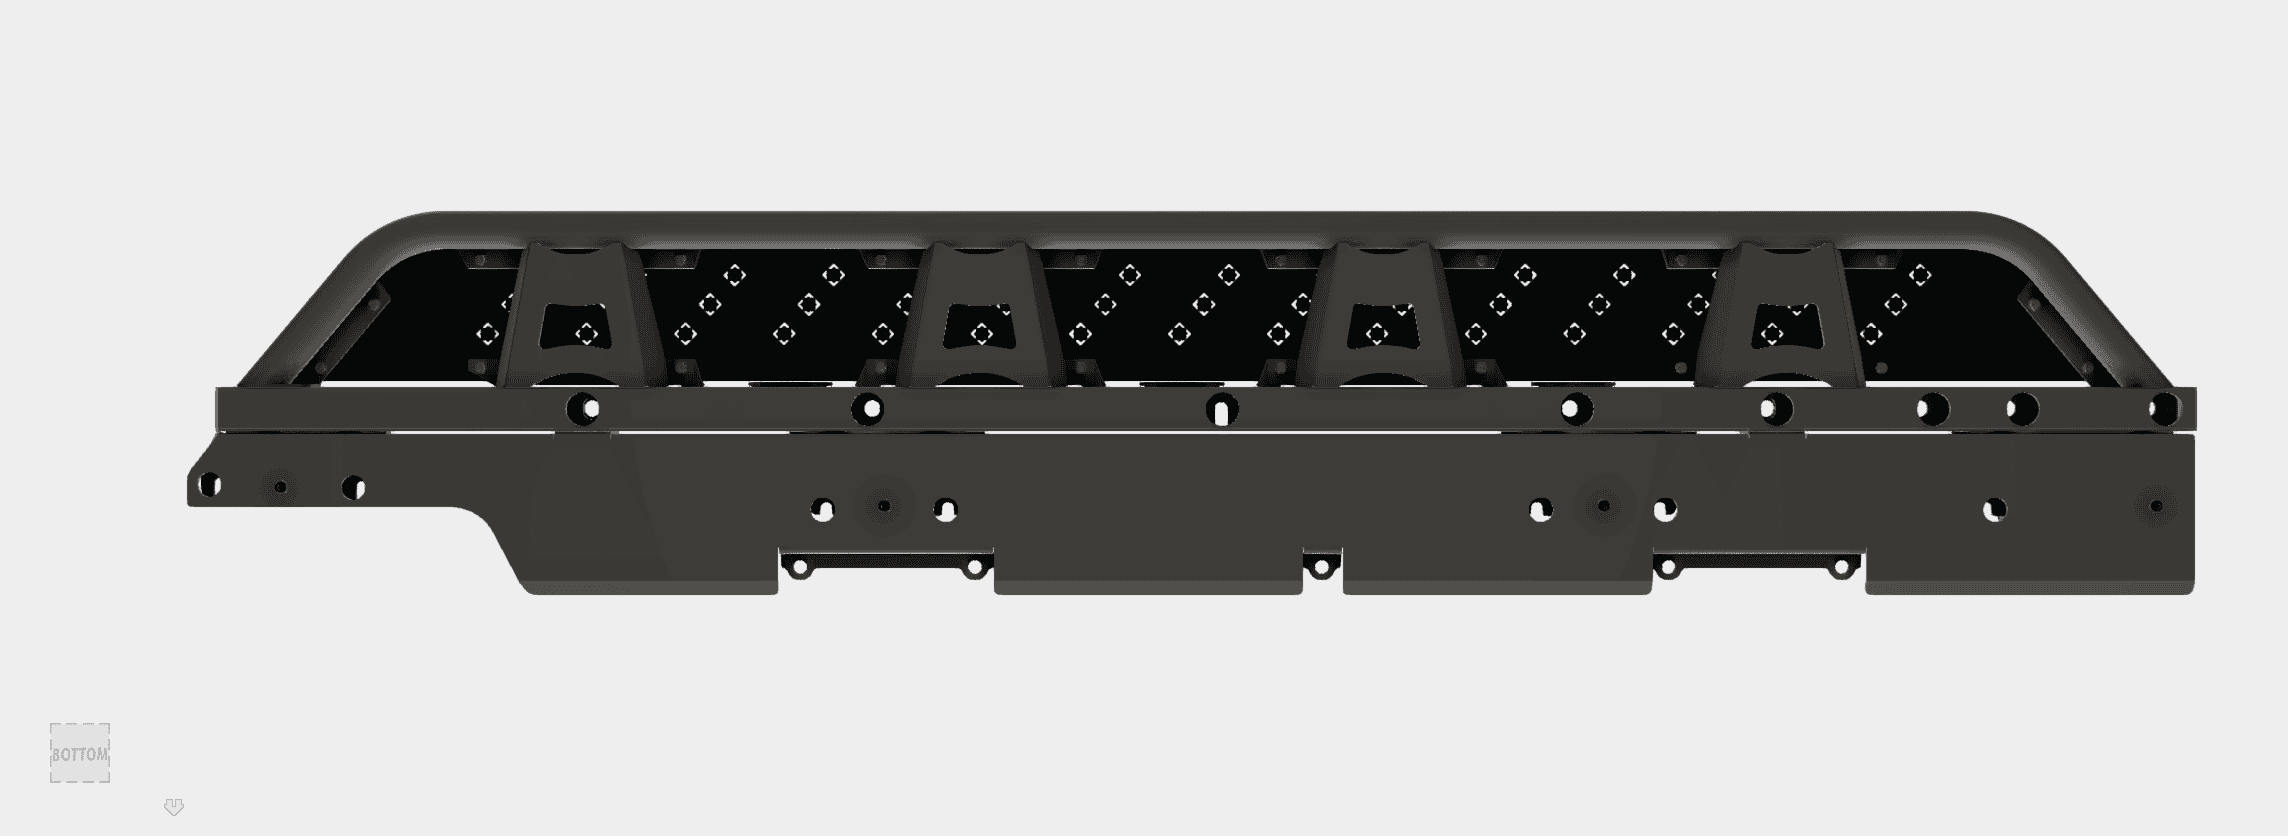
@EV Sportline Looks good! Any eta on the proper update and shipping? Thanks!
Sponsored


doit82

Well-Known Member
Joined
Jul 12, 2022
Threads
11
Messages
509
Reaction score
501
Location
Vermont
Vehicles
Model Y, R1T
Finally got my running boards installed this past weekend after some travel kept me from getting to them. I love them! They look great and make getting in and out of the truck so much easier. Thanks so much EV Sportline!
 

John G.

Well-Known Member
First Name
John
Joined
Jan 27, 2022
Threads
1
Messages
292
Reaction score
349
Location
Vancouver, Washington USA
Vehicles
2022 R1T
Occupation
Retired
A SLOTTED METHOD

My nephew, Aaron, and I installed the running boards over the Easter weekend. All in all, it took us about 7-hours, split between Saturday and Sunday, but it was worth it. After scanning the QR Code from Team 1EV RMaxx which was printed on the shipping box, we followed the clear instructions from their website video, and began to carefully remove the plastic panels. Our aim was to avoid breaking any of the clips.

When the shipment arrived, it did not include a TP55 bit, but it had all the bolts and nuts needed. Since Aaron had all the other tools required, I just had to make a quick trip to a local NAPA store to pick up a TP55 bit. While I was gone, Aaron continued removing all the plastic panels.

Next, we installed the running boards on the truck by following the video’s instructions. Aaron used his impact gun and a breaker bar on the large bolts. All the instructions on the website video were easy to follow. After that, we worked with one panel at a time to determine how they would fit over the running board brackets. I helped by overlaying and holding the panels in place over the brackets, while Aaron marked the corner points which would later form the “L” shaped cut-out to accommodate the brackets and allow them to stick out. We found that it is important to start with cutting and re-attaching the center panels first; then attaching the fronts and backs in any order.

We connected the dots we made on the panels with a straight-edge and black marker on a workbench. That formed a carefully drawn “L” shape cut-out (Drawing Attached) that we cut and removed from the outside surface of each panel. Cutting tools we used included a portable skill saw, and an oscillating multi-tool, along with a file and utility knife for smoothing rough plastic edges.

On our first panel, It took some dry fitting to double-check measurements and to modify the “L” shape before we had a workable plastic “L” shaped template that we could use, again and again, as a cutting guide for the rest of the panels. The template made the cutting easier and saved us some time.

ONE PROBLEM WE ENCOUNTERED

We had to make a few small adjustments to our “L” template for the panels on the front and back panels on driver side only. For some reason, our “L” shaped template overlapped a few of the outside-facing panel clips. Because we didn’t want to sacrifice any clips by cutting them out, we wound up cutting away very little of the plastic panels near those panel clips to keep them intact.

In the end, everything fit tightly back together. All the panel clips were intact and working, so we torqued all the bolts down to the recommended tolerances and called it an Adventure!

As soon as it gets warmer and drier in the Northwest, I plan on filling the panel voids with spray foam insulation, smooth and flush to the panel surface around the brackets, and to finish it off with an exterior spray paint to match the plastic panels. BTW, I have a great nephew and I know it?


Edited: to add a better photos of the running boards after the rain stopped.
Rivian R1T R1S Introducing RMaxx Running Boards & Rock Sliders for Rivian R1T / R1S from Team 1EV 20230509_180811


Rivian R1T R1S Introducing RMaxx Running Boards & Rock Sliders for Rivian R1T / R1S from Team 1EV Resized_20230410_140622


Rivian R1T R1S Introducing RMaxx Running Boards & Rock Sliders for Rivian R1T / R1S from Team 1EV Resized_20230410_140633


Rivian R1T R1S Introducing RMaxx Running Boards & Rock Sliders for Rivian R1T / R1S from Team 1EV Resized_20230410_140711


Rivian R1T R1S Introducing RMaxx Running Boards & Rock Sliders for Rivian R1T / R1S from Team 1EV New Drawing
 
Last edited:

Lizardo

Well-Known Member
Joined
Jun 9, 2022
Threads
28
Messages
740
Reaction score
504
Location
TX
Vehicles
R1T
Occupation
Self
Clubs
 
A SLOTTED METHOD

My nephew, Aaron, and I installed the running boards over the Easter weekend. All in all, it took us about 7-hours, split between Saturday and Sunday, but it was worth it. After scanning the QR Code from RMaxx which was printed on the shipping box, we followed the clear instructions from their website video, and began to carefully remove the plastic panels. Our aim was to avoid breaking any of the clips.

When the shipment arrived, it did not include a TP55 bit, but it had all the bolts and nuts needed. Since Aaron had all the other tools required, I just had to make a quick trip to a local NAPA store to pick up a TP55 bit. While I was gone, Aaron continued removing all the plastic panels.

Next, we installed the running boards on the truck by following the video’s instructions. Aaron used his impact gun and a breaker bar on the large bolts. All the instructions on the website video were easy to follow. After that, we worked with one panel at a time to determine how they would fit over the running board brackets. I helped by overlaying and holding the panels in place over the brackets, while Aaron marked the corner points which would later form the “L” shaped cut-out to accommodate the brackets and allow them to stick out. We found that it is important to start with cutting and re-attaching the center panels first; then attaching the fronts and backs in any order.

We connected the dots we made on the panels with a straight-edge and black marker on a workbench. That formed a carefully drawn “L” shape cut-out (Drawing Attached) that we cut and removed from the outside surface of each panel. Cutting tools we used included a portable skill saw, and an oscillating multi-tool, along with a file and utility knife for smoothing rough plastic edges.

On our first panel,iIt took some dry fitting to double-check measurements and to modify the “L” shape before we had a workable plastic “L” shaped template that we could use, again and again, as a cutting guide for the rest of the panels. The template made the cutting easier and saved us some time.

ONE PROBLEM WE ENCOUNTERED

We had to make a few small adjustments to our “L” template for the panels on the front and back panels on driver side only. For some reason, our “L” shaped template overlapped a few of the outside-facing panel clips. Because we didn’t want to sacrifice any clips by cutting them out, we wound up cutting away very little of the plastic panels near those panel clips to keep them intact.

In the end, everything fit tightly back together. All the panel clips were intact and working, so we torqued all the bolts down to the recommended tolerances and called it an Adventure!

As soon as it gets warmer and dryer in the Northwest, I plan on filling the panel voids with spray foam insulation, smooth and flush to the panel surface around the brackets, and to finish it off with an exterior spray paint to match the plastic panels. BTW, I have a great nephew and I know it?

View attachment 49610

View attachment 49612

Resized_20230410_140622.jpg


Resized_20230410_140633.jpg


Resized_20230410_140711.jpg


View attachment 49617

Great work. Wish I had a handy nephew :)
 

Sponsored

Scoiatael

Well-Known Member
Joined
Sep 20, 2021
Threads
49
Messages
1,162
Reaction score
1,816
Location
Southern CA
Vehicles
2025 R1S, 2024 Mach E
Got my boards delivered today. Where should the tp55 bit be? The hardware bag only has the nuts and bolts for the board and plate.
 

Lizardo

Well-Known Member
Joined
Jun 9, 2022
Threads
28
Messages
740
Reaction score
504
Location
TX
Vehicles
R1T
Occupation
Self
Clubs
 
M
Got my boards delivered today. Where should the tp55 bit be? The hardware bag only has the nuts and bolts for the board and plate.

Mine was in the bag with nuts and bolts. I had a Torx 20 and Torx plus 55 bits in there. Emptied them into a bowl to go through it all
 

Scoiatael

Well-Known Member
Joined
Sep 20, 2021
Threads
49
Messages
1,162
Reaction score
1,816
Location
Southern CA
Vehicles
2025 R1S, 2024 Mach E
M


Mine was in the bag with nuts and bolts. I had a Torx 20 and Torx plus 55 bits in there. Emptied them into a bowl to go through it all
Emptied both bags and confirmed no bits in there. One thing to note is that both bags were open, but the hardware bag they were contained in was closed. Also missing the instructions, but I assume I just print those out on normal 8x10 paper correct?
 

Lizardo

Well-Known Member
Joined
Jun 9, 2022
Threads
28
Messages
740
Reaction score
504
Location
TX
Vehicles
R1T
Occupation
Self
Clubs
 
Emptied both bags and confirmed no bits in there. One thing to note is that both bags were open, but the hardware bag they were contained in was closed. Also missing the instructions, but I assume I just print those out on normal 8x10 paper correct?

Mine was setup the same. Interior bag was open, but outer bag was sealed. No instructions provided other than a QR code on the box per previous posts on here.
 

windblowlc

Well-Known Member
First Name
Loc
Joined
Jul 29, 2022
Threads
15
Messages
1,158
Reaction score
1,039
Location
WV
Vehicles
Gen 2 R1S Quad, Porsche 911 Turbo S, Porsche Cayenne Turbo Coupe
Occupation
Retired
Emptied both bags and confirmed no bits in there. One thing to note is that both bags were open, but the hardware bag they were contained in was closed. Also missing the instructions, but I assume I just print those out on normal 8x10 paper correct?
Mine were the same with bags open inside and missing TP55/T20 bits. Order from Amazon or go to NAPA to buy if you don't want to wait.
 

Sponsored

Scoiatael

Well-Known Member
Joined
Sep 20, 2021
Threads
49
Messages
1,162
Reaction score
1,816
Location
Southern CA
Vehicles
2025 R1S, 2024 Mach E
Mine were the same with bags open inside and missing TP55/T20 bits. Order from Amazon or go to NAPA to buy if you don't want to wait.
Ended up ordering from Amazon, probably won't get to the install until Saturday anyways. Also realized most tp55 require a 3/8" drive, and my torque wrench is 1/4" drive, so I need an adapter anyways.
 

windblowlc

Well-Known Member
First Name
Loc
Joined
Jul 29, 2022
Threads
15
Messages
1,158
Reaction score
1,039
Location
WV
Vehicles
Gen 2 R1S Quad, Porsche 911 Turbo S, Porsche Cayenne Turbo Coupe
Occupation
Retired
Ended up ordering from Amazon, probably won't get to the install until Saturday anyways. Also realized most tp55 require a 3/8" drive, and my torque wrench is 1/4" drive, so I need an adapter anyways.
You will need to get a 1/2" drive torque wrench in order to torque to 95 lb-ft. 1/4" drive won't get that high, so you'll really struggle to make it there if at all.
 

Scoiatael

Well-Known Member
Joined
Sep 20, 2021
Threads
49
Messages
1,162
Reaction score
1,816
Location
Southern CA
Vehicles
2025 R1S, 2024 Mach E
You will need to get a 1/2" drive torque wrench in order to torque to 95 lb-ft. 1/4" drive won't get that high, so you'll really struggle to make it there if at all.
Just realized my 1/4 driver was in in-lb instead of lb-ft. Got a cheap 1/2 lb one off Amazon that should work.
 

Scoiatael

Well-Known Member
Joined
Sep 20, 2021
Threads
49
Messages
1,162
Reaction score
1,816
Location
Southern CA
Vehicles
2025 R1S, 2024 Mach E
Congrats, post some pics once installed. Just curious, what was your order date/order number?
Hoping I could at least get to the passenger side on Thursday when my torque bit comes from Amazon. I will post some pics when I'm done, though they will likely look more messy than what other people have done. Planning on just sawing the holes and patching with gorilla tape.

I ordered 11/22/22 and my order number was 222X.
Sponsored


Top