Sponsored

Rear suspension damage

100jacks

Well-Known Member
First Name
Beau
Joined
Feb 25, 2026
Threads
3
Messages
55
Reaction score
13
Location
Maryland
Vehicles
Rivian R1T
I did it with the whole thing on the ground, the kinetic suspension doesn't affect the springs/shocks it is just fancy sway bars.

The pump housing has spring clips you'll need to pry off with a small pick or screwdriver but be sure to not break them was you'll need them to seal the whole thing again.

Yes you have to drain from all 4 corners and with air pressure to each corner to clear out all the fluid then vacuum it otherwise you will not be able to fill it properly as air will be trapped in the lines. That step is messy so make sure you have your floors covered with cardboard or something to catch the oil spray. If there is air in the lines you won't be able to pressurize correctly as air compresses. Vacuuming without draining doesn't really work well as you'll have air bubbles trapped between fluid due to the small diameter of the pipes. There really aren't many shortcuts to this procedure though I did bypass the pressure tank rig and used a 100psi water pump instead.

You didn't need to change the valves as you could have just purchased OE compatible fittings instead. 1/4" NPT ISO 7241-B. Once you refill properly any opening of the lines means you have to redo the whole thing.

Just keep in mind here any shortcuts will mean you get to do the whole thing again, it is a tedious and messy job so take your time and do it right the first time. Before you fill the fluid make sure the system can hold a vacuum for a few hours to ensure there are no loose fittings and make sure to purge the air in the supply lines before opening the valves
I appreciate your detailed reply! I went back to instructions from the Rivian and looked if I could combine the RIDE draining the system and refilling it using the custom made Pump contraption.

I did buy the original female NPT valve connectors and I'll reinstall instead of Swagelock ones, since it's less expensive option and can be maintained by Rivian. Thanks for sending the ISO!

I also ordered the CH202 Fuchs Titan fluid, that Rivian recommends, instead of CHF11S which I had delivered previously.

I will remove the pump today and continue with the procedure. Do you connect the compressor to the valve connectors after blipping the pump and solenoids and you pump the air through each line that way? Just checking, that I'm not blowing the air through the line on the strut itself?

Also, did you blip both solenoids or just one?
Sponsored

 

Nixapatfan

Well-Known Member
Joined
Aug 23, 2024
Threads
7
Messages
618
Reaction score
1,247
Location
Massachusetts
Vehicles
R1T
I appreciate your detailed reply! I went back to instructions from the Rivian and looked if I could combine the RIDE draining the system and refilling it using the custom made Pump contraption.

I did buy the original female NPT valve connectors and I'll reinstall instead of Swagelock ones, since it's less expensive option and can be maintained by Rivian. Thanks for sending the ISO!

I also ordered the CH202 Fuchs Titan fluid, that Rivian recommends, instead of CHF11S which I had delivered previously.

I will remove the pump today and continue with the procedure. Do you connect the compressor to the valve connectors after blipping the pump and solenoids and you pump the air through each line that way? Just checking, that I'm not blowing the air through the line on the strut itself?

Also, did you blip both solenoids or just one?
Yes blow the air through the same valve connectors for filling and vacuum. Just open jounce line at each corner and blow air until all fluid is drained one at a time, close jounce line and move to the next corner until all 4 are done.
 

100jacks

Well-Known Member
First Name
Beau
Joined
Feb 25, 2026
Threads
3
Messages
55
Reaction score
13
Location
Maryland
Vehicles
Rivian R1T
Yes blow the air through the same valve connectors for filling and vacuum. Just open jounce line at each corner and blow air until all fluid is drained one at a time, close jounce line and move to the next corner until all 4 are done.
@Nixapatfan I did blow compressed air through All the lines separately. However, Can you please explain to me like to a child how to disassemble the air compressor pump once I take it out of the housing. I cannot find the reservoir tank cap and with all the foam I cannot find a way to easily remove the pump without damaging it.
Do I disconnect all the pump lines first and then you take the thing out of the housing and then you refill it and put it back?
 

Nixapatfan

Well-Known Member
Joined
Aug 23, 2024
Threads
7
Messages
618
Reaction score
1,247
Location
Massachusetts
Vehicles
R1T
@Nixapatfan I did blow compressed air through All the lines separately. However, Can you please explain to me like to a child how to disassemble the air compressor pump once I take it out of the housing. I cannot find the reservoir tank cap and with all the foam I cannot find a way to easily remove the pump without damaging it.
Do I disconnect all the pump lines first and then you take the thing out of the housing and then you refill it and put it back?
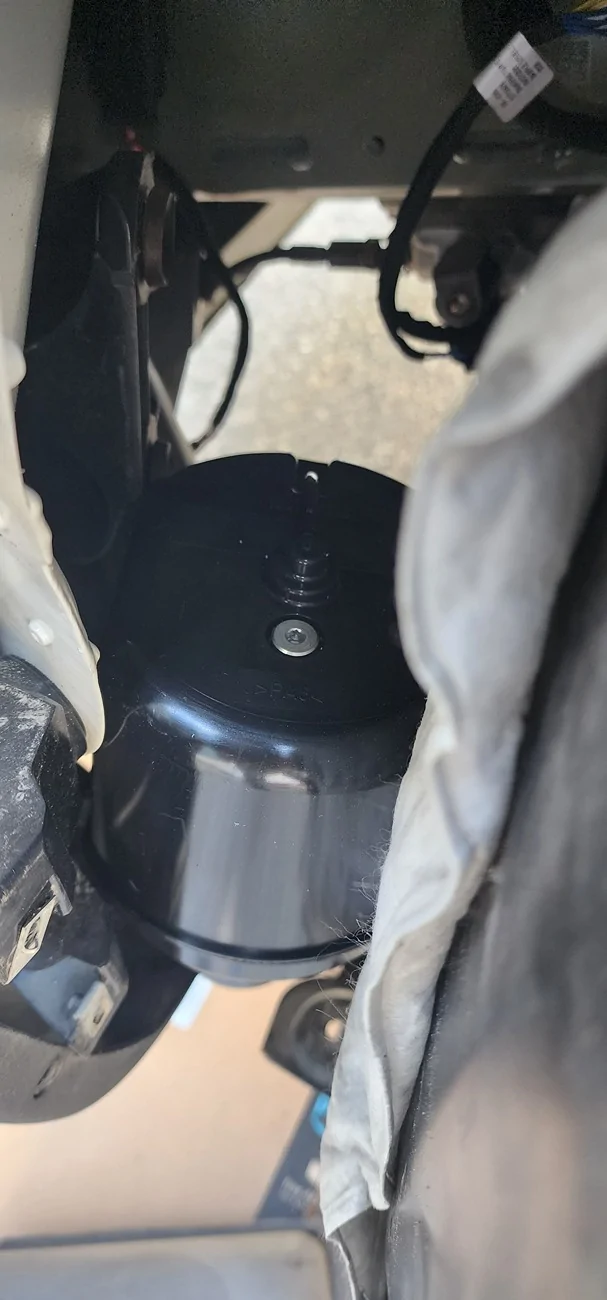
I'll have to dig up a picture I took of it. But no further disassembly is needed once you get it out of the foam shell. The reservoir tank is the round plastic tank on top with a small hex plug,you remove the plug and fill it with a tiny funnel and a piece of tubing. It's a slow process as the hole is small and have to wait for air bubbles to come out as you fill.
 

100jacks

Well-Known Member
First Name
Beau
Joined
Feb 25, 2026
Threads
3
Messages
55
Reaction score
13
Location
Maryland
Vehicles
Rivian R1T
Did you have to remove the line going to the solenoid assembly to remove the pump out of the housing?
I took the pump down and removed all the clips holding it . It seemed like bump doesn't want to move out of the housing. I didn't want to yank it out because I wasn't sure if anything else is holding it and don't want to damage any lines, after reading Cuz's experience.
I appreciate your help!
 

Sponsored

Nixapatfan

Well-Known Member
Joined
Aug 23, 2024
Threads
7
Messages
618
Reaction score
1,247
Location
Massachusetts
Vehicles
R1T
Did you have to remove the line going to the solenoid assembly to remove the pump out of the housing?
I took the pump down and removed all the clips holding it . It seemed like bump doesn't want to move out of the housing. I didn't want to yank it out because I wasn't sure if anything else is holding it and don't want to damage any lines, after reading Cuz's experience.
I appreciate your help!
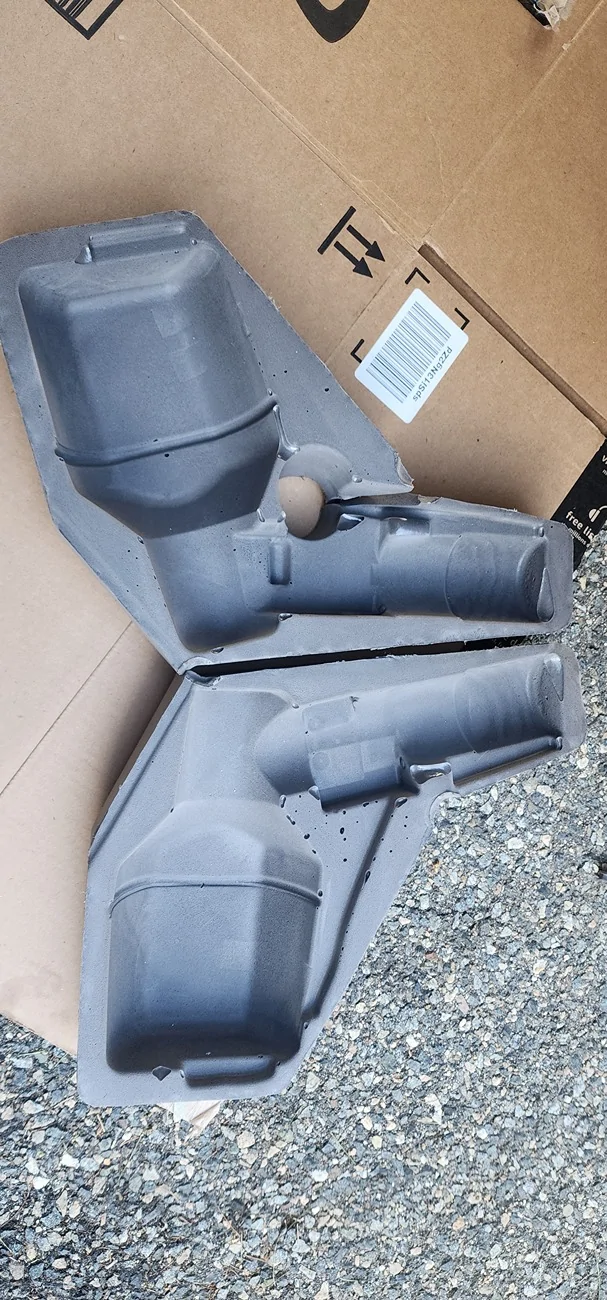
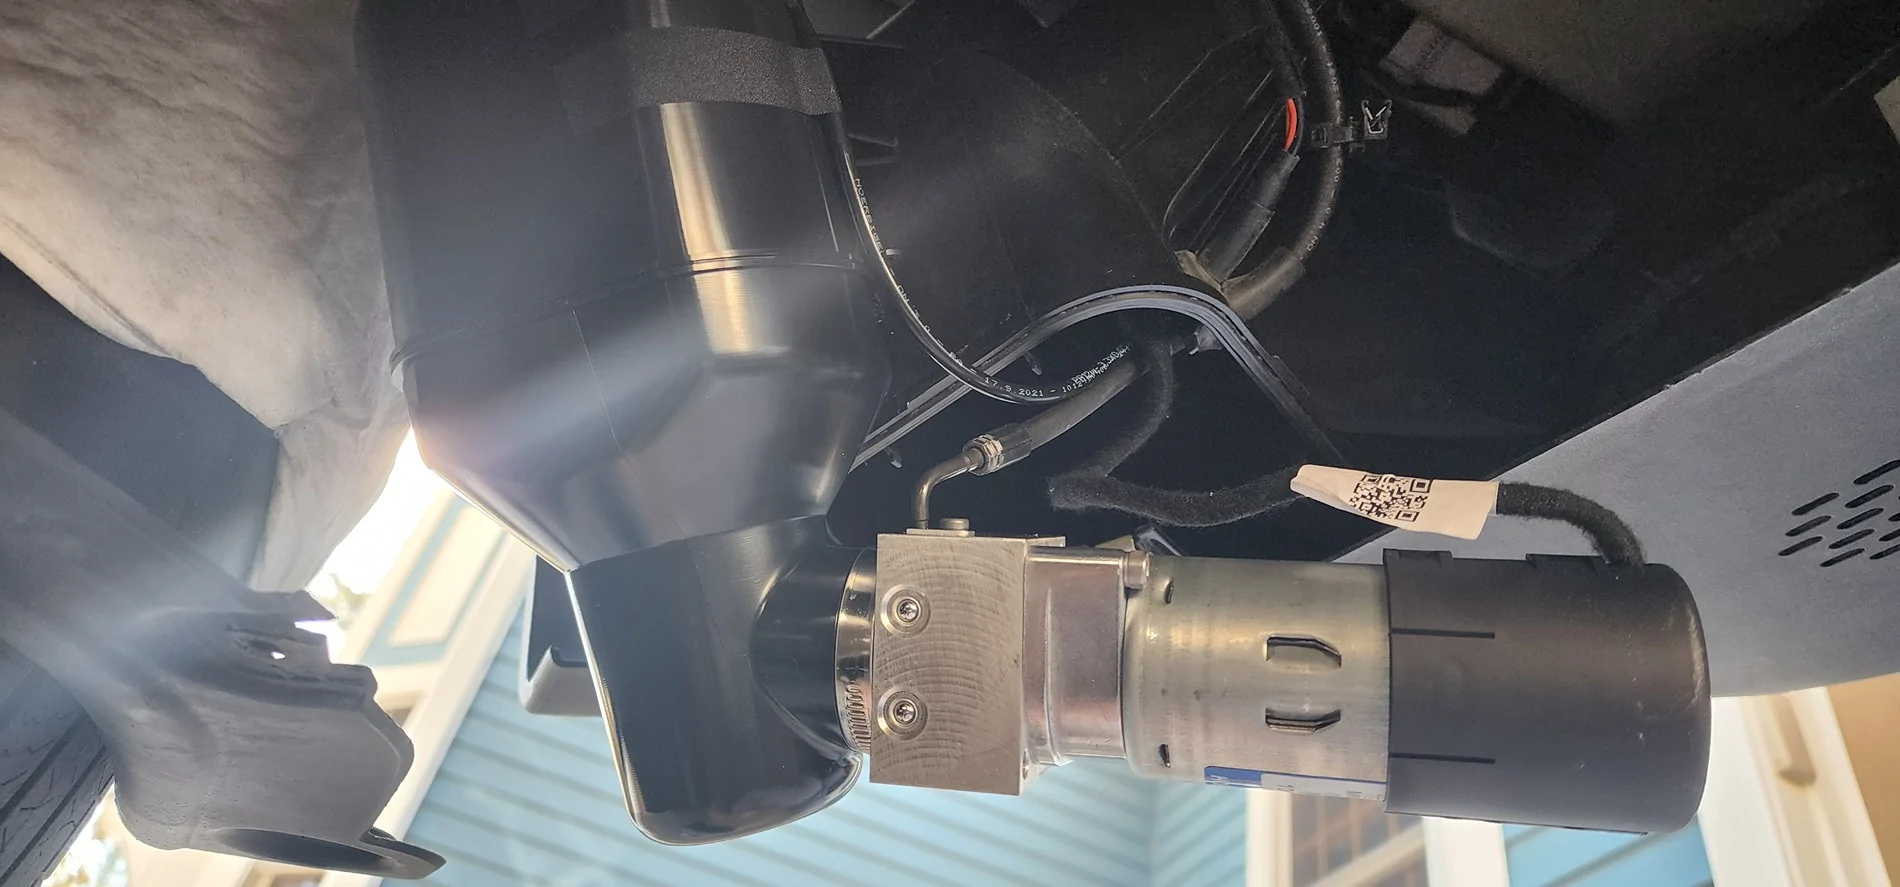
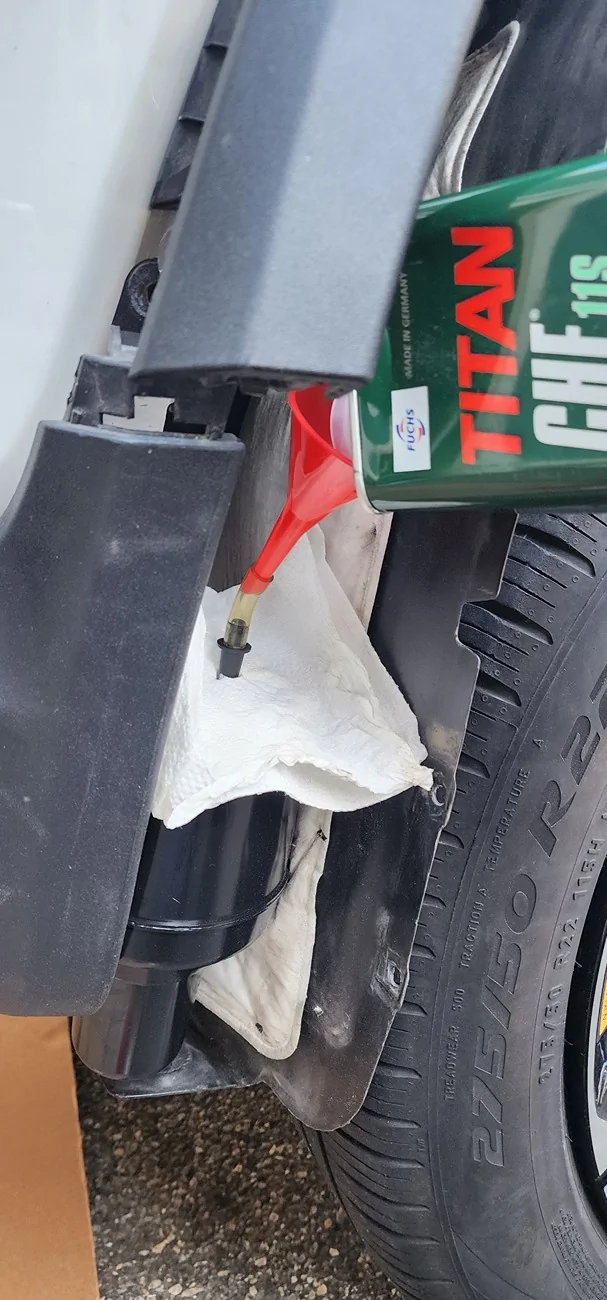
I did not disconnect the line. You'll need to get it out of the foam to see the filler plug. Foam is just friction fit into the housing.
Rivian R1T R1S Rear suspension damage 20250311_145405

Rivian R1T R1S Rear suspension damage 20250311_145426


I wedged the pump between the tire and wheel well and bumper trim to get access to the fill hole.
Rivian R1T R1S Rear suspension damage 20250311_145504


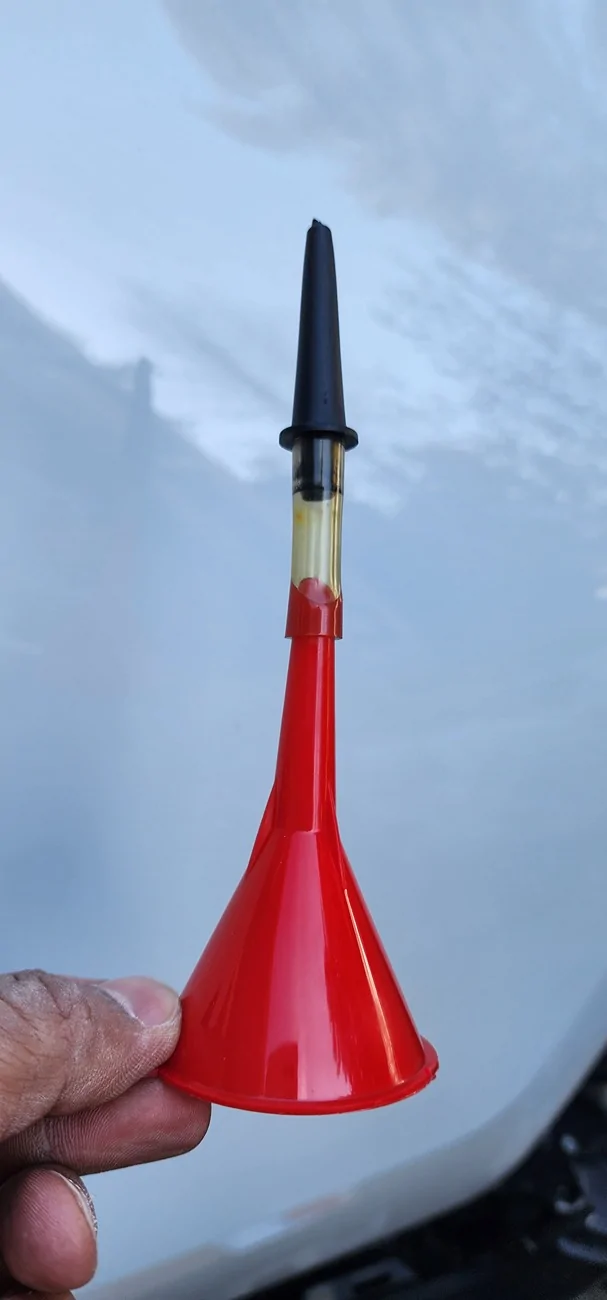
Made a filling tube with funnel and parts from a brake bleeder. Hindsight might be easier with a squeeze bottle.
Rivian R1T R1S Rear suspension damage 20250311_151731

Rivian R1T R1S Rear suspension damage 20250311_152013
 

100jacks

Well-Known Member
First Name
Beau
Joined
Feb 25, 2026
Threads
3
Messages
55
Reaction score
13
Location
Maryland
Vehicles
Rivian R1T
Thanks again @Nixapatfan for all the details.
I finally removed the pump and refilled it with fluid to the brim. It was a royal pain to remove it from the housing. (I needed to separate the grommet by holding the pipe on the side of the pump and pulling the grommet away from the plastic, to allow some space) so I can pull the pump from the housing without putting too much tension on the pipe. That pipe does look very fragile. I took your advice and used a squeeze bottle.
I ran the pump for a few seconds and blipped both solenoids one at the time.
After that I ran the vacuum pump and pressure filled the system.
Restarting the car helped, the turtle mode is off and I can change the ride height and into off-road mode. However, the red damper warning is still on the dash. I'll try to get RiDE tomorrow and perform some resets.
 

alexdw369

New Member
First Name
Alex
Joined
Aug 27, 2026
Threads
0
Messages
2
Reaction score
1
Location
AZ
Vehicles
2022 R1T
I realize this thread is a few months old at this point, but just to add to the pile of info we're amassing:

I just completed the hydraulic drain-evacuate-refill procedure and learned a few things along the way. It started when the front right corner of my truck started feeling like it had a blown shock and the truck would throw suspension errors every few times it started up. The truck was 2k miles outside of the factory warranty and Rivian wasn't willing to help. They told me that the diagnostic code indicated "debris in the system", presumably preventing valves from separating the H1 and H2 halves of the system. And the only solution is to replace the whole system. All four dampers (the front two of which had only just been replaced a few thousand miles before under warranty), the pump, the distribution manifold, and all the tubing and jounce lines. $11k. I told them to pound sand.

The most logical failure to me, was either an inadequate hydraulic bleed from the SC when they replaced the front two dampers under warranty around 56k miles, or perhaps there's a nitrogen bladder or accumulator in one of the new dampers that ruptured. Infant mortality sounds far more plausible to me than "debris in the system". But, with little to no documentation available on these dampers, I just ordered one from ebay and hoped I was right.

Depressurizing the hydraulic lines was an oily disaster. I was afraid a system sitting at 27bar (nearly 400 psi) would blow the tubing right off the back of the female quick connectors of my vacuum rig if I just crammed them onto the factory male hydralic quick connectors. I tried anyway, but couldn't get them connected agaist the 400psi working against me up up over my head. So I just "vented" the pressure off with a C-clamp to depress the poppet valve on the male fitting. You can probably imagine the mess. I had oil in holes I didn't know I had. Oh well, it was midnight and it was the only idea I had at the time.

Damper swap went fine, you can get away with just disconnecting the upper ball joint and the tie rod in order to make enough clearance to get the damper assembly out once you disconnect the air line from the top. When draining (and air-purging) the old fluid, I worked from longest-to-shortest line distance...so I started with the front right jounce lines, then front left, then rear left, then rear right. I figured, since I didn't do anything to introduce air into the distribution manifold, I didn't need to bother with the pump-solenoid jump dance, since I only needed to refill the tubing I drained. Pulled vacuum, held it for about 2 minutes just to be sure, then sucked the new fluid in and applied pressure to the top of the vacuum rig fluid reservoir and got everything up to about 120psi. It was a breeze. Then I opened the door, which woke the truck up, and I heard the pump start running. Was going great for about 5 seconds, building pressure...until the reservoir ran dry. Only made it to 13bar. And now I DID potentially have air in the manifold. So I had to pull the pump and reservoir out and disassemble to refill and try again. And @100jacks, I agree - gettting the pump out of the housing to add fluid to the tiny reservoir was the biggest pain in the butt of this whole project. After seeing what a giant pain that is, my suspicion is that the SC never once, in any of the THREE times they had that hydraulic system opened up for damper replacement, never once did they top off that reservoir. It's physically possible, but it's just not intended to be serviced. Whatever Rivian/Monroe intern team that designed that garbage packaging, I hope they all stub their toes in a McDonald's kitchen today.

All of that ^^^ was just backstory (sorry). Here's what I'm actually wanting to contribute to the thread:

Instead of doing all the physical jumping of solenoids and bumping the pump, I just tricked the pump into running on its own. After disconnecting hydraulic lines from all four corners of the truck, and blowing out most of the old fluid with compressed air (via the vacuum rig setup described in this post), I reconnected all the hydraulic tubing and just pressurized it with air to about 100psi, then woke the truck up. It saw enough downstream pressure to run the pump and try to raise the pressure in both circuits, which should have purged everything from the pump to the outlets of the distribution manifold of any air that could have been introduced. THEN I pulled vacuum on the remainder of the hydraulic circuits downstream of the manifold, and pulled fluid in, pressurized to 120psi (just what my air compressor is usually set to), woke the truck up, watched it go to 27bar in the RiDE display, and went for a drive. After 8 months of reading, planning, and trying accept the risk of turning my truck from a bouncy (but drivable) jalopy into a 7,000lb paperweight, MAN it feels nice to have a truck that feels like it did the day I bought it.

TL;DR:

1) Don't assume the hydraulic reservoir in the truck is full enough for your needs. Just pull it and top it off before you turn that headache into a full-blown migraine.
2) You can trick the truck into believing the hydraulic circuit is intact by adding an extra step before vacuum pull to pressurize with air so that the pump will run and solenoids will pulse open on their own, avoiding any need to find a 12V source, figure out polarity, or wish you had been born with 3 sets of hands.
 

100jacks

Well-Known Member
First Name
Beau
Joined
Feb 25, 2026
Threads
3
Messages
55
Reaction score
13
Location
Maryland
Vehicles
Rivian R1T
So I like that you confirmed that part with the pump top off, because I'm kind of dreading the day I'd have to do this again.
I replaced all the damper wires leading to solenoids and my error codes went away and drive feel improved.
However, I think my rear driver damper is busted anyway and I'll need to replace it. I bought an "used one" with basically 0 miles on it, but my drive feels bouncy sometimes and the damper makes noise on the bumpy terrain. My take it is relying on air suspension at this moment and that damper doesn't leak, but it's probably blown. Appreciate your write up @alexdw369
 

alexdw369

New Member
First Name
Alex
Joined
Aug 27, 2026
Threads
0
Messages
2
Reaction score
1
Location
AZ
Vehicles
2022 R1T
So I like that you confirmed that part with the pump top off, because I'm kind of dreading the day I'd have to do this again.
I replaced all the damper wires leading to solenoids and my error codes went away and drive feel improved.
However, I think my rear driver damper is busted anyway and I'll need to replace it. I bought an "used one" with basically 0 miles on it, but my drive feels bouncy sometimes and the damper makes noise on the bumpy terrain. My take it is relying on air suspension at this moment and that damper doesn't leak, but it's probably blown. Appreciate your write up @alexdw369
When we talk about "blown" suspension, I think we kinda oversimplify it and boil it down to that word for people that just understand basics. Like, generally, when you hear "blown shock", it's usually not mechanically compromised, its just that the oil seal between the body and the shaft wears, like anything that is two parts rubbing against one another, and that allows all the shock's oil to leak out over time, and eventually, there's not enough oil left in the shock to preclude air from being drawn through the shim stacks instead of a non-compressible hydraulic fluid, resulting in a bouncy, uncontrolled ride. If there's nothing leaking externally on your damper, in a system like this, it's most likely the result of air (or nitrogen) in the part of that damper that is only supposed to have fluid. Alternately, it could be a solenoid that controls oil flow seized or failed (no electrical signal) in whichever direction allows full flow. It looks to me like these dampers have a fluid circuit that has an adjustable rebound stack, an adjustable compression stack, and a bypass (presumably for preventing cross-talk between the H1 and H2 circuits to allow body "roll" at low speeds, such as pulling into or out of driveways, but enables cross-talk between the circuits at higher speeds). Now that my truck is fixed, I'm going to tear into my old damper when I get home next week because I really want to understand how they work. Without a real description of what the noise you say your damper is making on bumpy terrain, my first inclination would be an air bubble of some sort, not big enough to completely displace the hydraulic fluid, but enough to cause cavitation (which would sound like a bit of a whistle) in the valve body - which would just require a re-bleed, not necessarily a new damper. I'll post up what I find when I tear this damper apart.
Sponsored


Top